Download Our Sunne App
To change more light settings and check the battery status and energy harvested, download the Sunne app.
This also gives you access to firmware updates for continuous improvements.
please download the app from the store that matches your device’s operating system.
![]()
![]()
FAQ
Accordion title
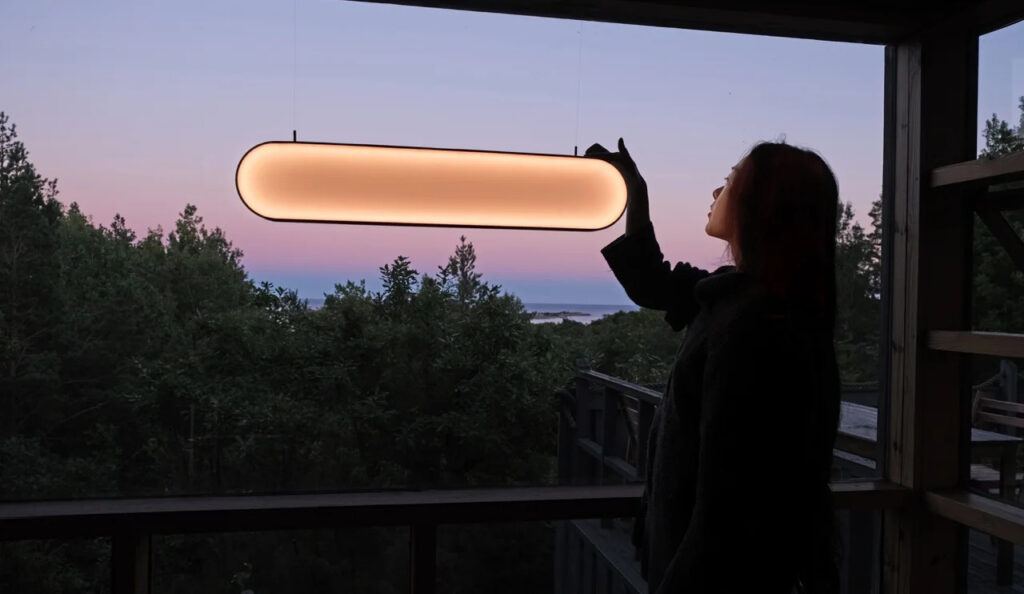
Sunne likes to hang in front of a sunny window. It captures the sun-rays during the day and glows after sunset (when this is set in the Sunne app). Here is a quick explanation of how to hang your Sunne.
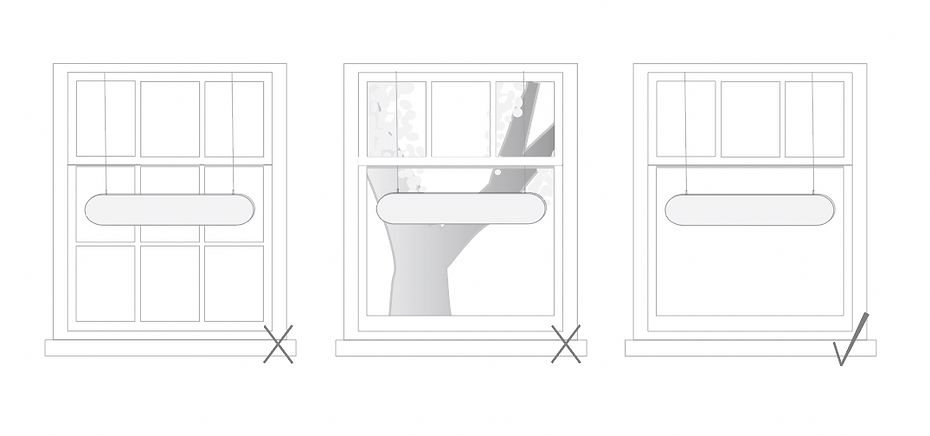
Start by selecting the window that catches the most sun during the day. If you’re in the Northern Hemisphere, the best orientation is south. But depending on the location, east to west can also work.
Sunne should not be too shaded by trees, or by the window frame. Sunlight must be able to reach the solar surface on the back.
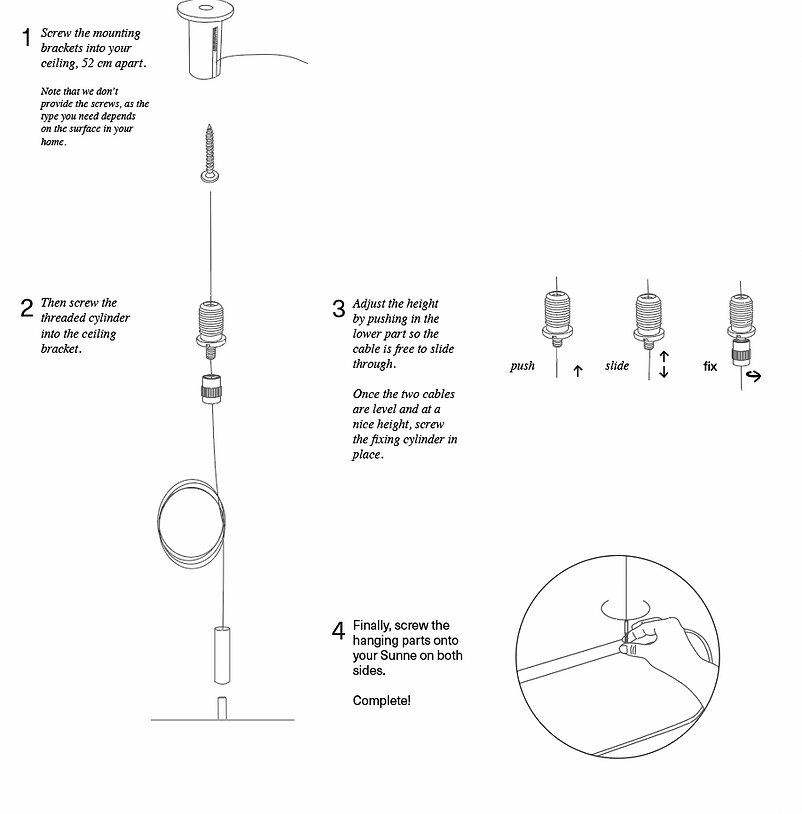
The instruction manual that comes with the Sunne, can be downloaded here.
A short press will switch Sunne on, another short press will set the next light mode. A long press (about 3 seconds) will put your Sunne to stand-by mode. Holding the power button (at least 6 seconds) until it flashes blue will put Sunne in the bluetooth pairing mode.
With the power button on top of Sunne, you can cycle through 3 different modes: sunrise, sunlight and sunset. Download the Sunne app and pair to your Sunne to unlock more features; your Sunne can automatically switch on at sunset, and you can monitor the charging performance and battery level.
When this indicator light is on, Sunne is charging. When the indicator light is blinking slowly, the battery is fully charged.
You can either charge your Sunne with solar energy by hanging the Sunne in a window with the solar panel facing south. Make sure the solar panel is not covered. Or charge by USB-C using a suitable charger and cable (check following questions).
In the Sunne app you can check the charging current. The higher the current, the faster your Sunne will charge. Consider swapping the USB-C adapter to increase the charging performance. For example; charging with 500mA will take your Sunne a long time to fully charge. 1000mA to 1500mA will reduce the charging time by 2 or 3 times.
We have tested many chargers and found this one to be very easy and reliable: LINK
This really depends on the charger that is being used, but when charged with a 5V -1500-2000mA it will take about 5hrs to fully charge.
When your Sunne battery is fully charged, the orange indicator light on the side will start blinking.
With a fully charged battery, Sunne can glow for more than 14 hours. This means it can still glow for you even on a cloudy day. Each evening, Sunne will use some of this stored energy when the automatic sunset is switched on in the app. Then the next day, if the sun shines, Sunne will generate energy to top up the battery level again. This is Sunne’s self-sufficient energy cycle, powered by the sun.
In Summer, temperature can be an important factor – some windows get really hot – so we suggest not hanging Sunne directly against the window. It’s best to leave at least a 2cm gap, to allow some cooling airflow. Above 45 degrees Celsius, the charging performance is limited for safety reasons. So if you see a lot of sunlight shining on Sunne, but it is not charging well, check the temperature in the Sunne app. Check the temperature by pressing the battery icon in the app. Now a pop up screen will be shown. Press and Hold this pop up window and check the temperature information that is visible.
In Winter, sometimes there may not be enough sunshine to charge your Sunne sufficiently, especially if you like to use the light a lot during the day. Consider giving it a charge through USB C then.
To generate energy, sunlight must reach the entire solar surface on the back of Sunne. So, check if there’s any obstacles shading Sunne from the sun, like the window frame or a tree. The way solar panels work, even partial shading can have a massive impact. Adjust Sunne’s position to avoid shading. Besides that, if it’s a cloudy day, Sunne’s solar panel will generate less power. Consider giving it a charge boost using a USB C charger. In the Sunne app, more information is available about the battery status and how well Sunne is charging through the solar panel.
In Summer, temperature can be an important factor – some windows get really hot – so we suggest not hanging Sunne directly against the window. It’s best to leave at least a 2cm gap, to allow some cooling airflow. Above 45 degrees Celsius, the charging performance is limited for safety reasons. So if you see a lot of sunlight shining on Sunne, but it is not charging well, check the temperature in the Sunne app. Check the temperature by pressing the battery icon in the app.
This depends on how much sunlight it catches, but when it is charging with 1500-2000mA (you can see the current flow in the app) it will probably take about 5hrs to fully charge your Sunne.
Check in the Sunne app if Sunne is charging by tapping the battery icon below the slider. The pop up shows the charging current. It might say Current: 0. If your lamp is on, any solar energy harvested will go directly to powering the lighting, instead of charging the battery. So, it’s best to enjoy Sunne’s glow after the sun sets.
Of course solar panels need bright sunshine, but they actually don’t perform well when they get too hot. Plus, Sunne’s charging performance is limited above 45 degrees celsius for safety reasons. So, make sure you don’t hang Sunne directly against the window, but leave some space for cooling airflow. When Sunne is cooled down enough, it will return to its normal state.
When the charging led is blinking, this means your battery is full. If the charging led keeps on blinking, turn your Sunne off and on again. This should solve the problem.
The battery level is too low, so Sunne switches off by itself to save energy. Consider putting Sunne in the sunlight, or charge with a suitable USB-C charger.
Did you know that Sunne is intelligent? How brightly it glows corresponds to its battery level, to maximize the length of time it will glow for. So, if it’s not getting enough sunlight, consider giving Sunne a boost charge through USB-C to enjoy it at full brightness.
Depending on the battery level, Sunne will automatically adjust the brightness.
Go to the app store or google play store and search for Sunne Solar or click here for the iPhone app and here for the playstore app. Install the app and make sure that ‘Location services’ for the Sunne is switched on.
If you use the app for the first time, the app will guide you through the steps. Moreover, press and hold Sunne’s power button until the lamp starts flashing blue. Now your Sunne is in pairing mode and can be connected to your phone.
Make sure your bluetooth, wifi/5G and location(GPS) are switched on on your phone and that your Sunne is charged. Make sure you are in close proximity to your Sunne. Make sure the battery is at least charged to 50%.
It might be that the Sunne app does not have the rights it needs from the Android phone in order to operate properly. Also, Android could be set up in such a way that it cannot request these rights either. Please change these settings in order to make this work.
If none of these solutions work, remove the Sunne from your bluetooth devices list delete the Sunne app and. Download and reinstall the Sunne app and try connecting to the Sunne again. For android phones first try to delete your App data and cache.
Go to the menu in the Sunne app (tap the icon in the upper right corner) and tap: add Sunne. The Sunne app will search for Sunne’s in your surroundings.
You can add up to 8 Sunnes to your Sunne app.
You can add up to 8 devices to 1 Sunne. We recommend to not connect more than 2 devices to your Sunne, to make sure it keeps on operating smoothly.
Go to the menu in the Sunne app (tap the icon in the upper right corner) and toggle ‘Switch on at sunset’ on. Make sure you have your Location services switched on in your phone settings for the Sunne app, so the app can define your location and calculate the sunset time.
Here are our top tips to solve this:
- First; did you activate the automatic sunset setting in the app? See answer above
- Using the app, check if Sunne charged well during the day. Sunne only switches on at sunset if the battery level is above 10%. It needs more than 10% battery level to switch on. You can give it a boost charge through the USB-C port to bring the battery level above 10%.
- Make sure the app has permission to use the location of the phone. It uses that to calculate the sunset time.
When the Sunne does not respond to any input through the power button or the app, you can factory reset the Sunne, meaning it will reboot the Sunne and remove all saved data.
Before proceeding with the factory reset, first remove your Sunne device from the bluetooth list on your phone, after that remove the Sunne app (either iOS or Android, for Android be sure to first delete your App data and cache).
Then proceed with the actual factory reset by holding down the power button for 30 seconds, until Sunne starts flashing red. Now the Sunne will reboot and is ready for reconnecting.
After the factory reset, reinstall the app and pair your Sunne to your phone by going through the usual steps.
Yes, open your Sunne app, go to the menu and select: update Sunne. If there is an update for you to download to your Sunne, it will show you. If your Sunne is up to date, it will state: your Sunne has the latest firmware version!
- Tap “update firmware” in the menu of your Sunne app, and tap the button: “Start firmware update”
- Stay close to your Sunne, do not close the app while updating the firmware
- Do not connect two phones at the same time
- Make sure your phone is connected to the internet
- Do not press the power button on the Sunne while updating
- Make sure your bluetooth is switched on on your phone
- Make sure your Sunne app is up to date, if not, update in the app store or google play store
- Make sure you are in close proximity of your Sunne
- Make sure you are connected to your Sunne through the Sunne app
- Make sure your Sunne has enough battery, if not, charge Sunne in the sunlight or use a USB C charger to charge boost your Sunne to at least 50%.